Lessons learned building a smoking detector for video with machine learning
As someone who has spent a lot of time working with media companies implementing machine learning, I get asked a lot about the ability to detect smoking in video. It’s a big issue for distributing media content to other countries, but it also demands that we ask some tough questions about the current state of artificial intelligence. This story is a chronicling of my attempt to build and test a machine learning model to detect when people are smoking in movies, and a summation of what I learned.
Why smoking?
Smoking is actually a tricky action to classify, and even just thinking about the problem forces you to draw some lines in the computer-sand™, which is important for building machine learning models. Is smoking just the act of taking a drag from a cigarette? What about lighting a cigarette? Or simply holding a smoking white stick in your fingers? Is it smoking if you can’t see the cigarette on screen but there’s some white smoke coming out of a character’s nose or mouth?
Different countries have different rules about how smoking can be depicted in films and television. For example, in Turkey, television broadcasts have to have smoking blurred or otherwise obfuscated. A screw up can get you fined from the government.
So if we can build a machine learning model to detect smoking in movies or television, we might be able to help save some folks a lot of time and money from doing it manually.
But from an image recognition perspective, that is a very hard problem to solve.
I’ve written before about the challenges of image recognition capabilities with video, so if you’d like to learn more please read that…. I’ll wait.
Training
We want to detect smoking in movies, so the natural source of training data are movies where people are smoking. A quick YouTube search revealed a couple of videos that are essentially super cuts of people smoking in movies.
The key to success is to find videos where there is footage of people smoking, and footage of the same people, preferably in the same scene, not smoking. This is key. You need to tell a classifier what is smoking as much as you need to tell it what isn’t smoking.
So, I opened up good ol’ iMovie and popped the YouTube videos into the project. I then went through and meticulously edited together JUST the frames of people smoking. I drew the line at people with cigarettes in their mouth. I saved that new weird video and exported it to a file.

I then edited together a string of frames from the same scenes but before or after the cigarettes go into the mouths (what a strange sentence).

Now I have two videos, of slightly different lengths, one with smoking and the other without. The next step is to chop them into frames so that I can teach a machine learning model.
Fortunately, this part is easy. Just open up terminal, make sure you have FFMPEG installed, and put in this command:
$ffmpeg -i path/tp/video.mp4 path/to/output/label%04d.jpg -hide_banner
Run that on each video and get all of your frames into folders labeled ‘smoking’ and ‘not_smoking’.
Now, you probably have a different number of jpegs in each folder, so we’re going to have to remove some to make sure the two classes are trained in a balanced way. If you have too many of one class, the model will become biased towards that class. But you can’t just select a chunk of X number of files to delete from one of the classes either, you must delete the files at random so as not to further bias the model.
I spent WAY too long searching the internet trying to figure out how to randomly delete X numbers of files from a folder. I eventually landed on this terminal command (N is the number of files you want to delete):
$ ls |sort -R |tail -$N |xargs rm
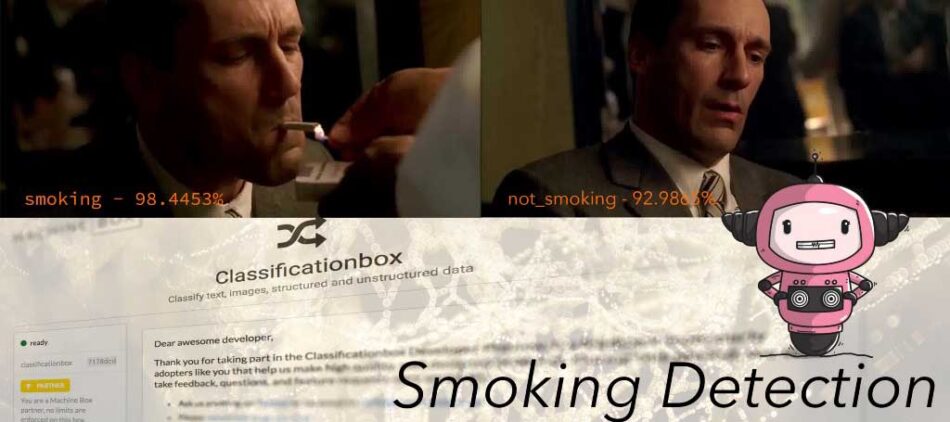
Ok, now we have the same number of images in each folder, it is time to use some nifty tools provided by Machine Box.
Download and run the open source tool imgclass which takes care of a lot of the hard parts of training and validating data for you. It requires that you have Classificationbox running in the background so make sure you’ve downloaded that as well.
When you run imgclass, it will:
- Scan the directories.
- Separate out 80% of the data and teach the machine learning model with that data.
- Validate the accuracy with the remaining 20% of the data.
When I did this, I got an accuracy of around 97% which seemed suspiciously high. I may have overfit the model, but in order to know for sure, we’ll have to test.
Testing
So I now have a machine learning model trained to detect smoking in videos. But I don’t know how well it works. I need to find other videos of people smoking that are not from the training set. So I went back to YouTube and downloaded a video from Mad Men. I know, just from editing the training data, that there were no scenes from Mad Men in the training set, so this should be a good test. But how to test?
This was the hard part. I needed to chop up the video into frames and run each frame against the trained model inside Classificationbox, then evaluate the results.
“But how do you do that?” I screamed at the cat.
If you have any scripting chops, they’ll come in handy at this point. If you don’t, you’ll need to use a platform that can handle processing videos, training Classificationbox (or other machine learning models), and showing results in a UI of some sort so you can validate the accuracy. There’s a really handy one I work with called aiWARE that lets you sign up and run these kinds of tests for free without needing to write any code.
If you’re into writing code then you’ll find this next bit abhorrent. Here is a Golang script I hacked together to validate a video file (chopped into frames in a folder) with the machine learning model, print the results onto the frame and output that frame as a PNG. I can then use FFMPEG to assemble all the printed frames back into a video as a post process.
https://medium.com/media/92b4e93c1a8b76c87ff343123058823e/href
Here is an example of the output:
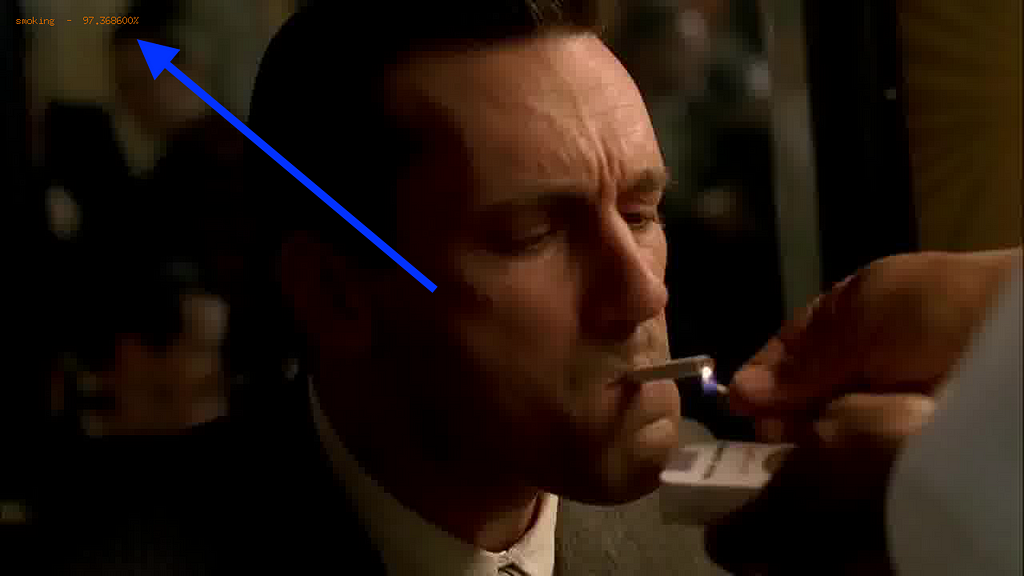
If I were better at computers, I could probably figure out how to make that damn label bigger, but I’ll leave that to real programmers to figure out (probably very quickly).
Next, I stitched all the frames together into a video so that I might watch the entire scene and judge my machine learning model.
$ ffmpeg -i [label]%04d.png -c:v libx264 -r 30 -pix_fmt yuv420p out.mp4

Notice the tiny label in the upper left hand corner? Put on your glasses… now do you see it? It’s a great way to visually see just how well your model is doing on any given video. The score is also important as it gives you some feedback from the model about how sure it is that what you’re sending it is in a particular class.
Once you try this on 10 videos, you’ll start to see a pattern in the confidences and you can start ignoring anything below a certain threshold.
Great, now what?
The key to getting a smoking detection to work for your use case is experimentation. If you have the right tools, experimenting can be simple and cost-effective.
Now that I’ve got some feedback from my model, I might try to teach it more and more examples of smoking and not smoking, to see if I can reduce the false positives and negatives.
Ideally, I am grabbing as many examples from my real use case as possible to chop into frames for teaching.
The nice thing about Classificationbox is that it supports online teaching. You can teach it while it’s running, without having to redeploy or go through expensive training cycles. This lets you incrementally improve it over time as you give it feedback from its own results.
This is the secret to success with machine learning. I’ve seen it work countless times. Spend your effort on your training data.
A model that is trained on your data will always out perform one that is generic or trained on general data.
So now you have the tools to do this yourself. If you develop a great model with Classificationbox on your own or inside aiWARE, make sure you take some screenshots and share it with us here on Medium or by Tweeting it to us Machina — @machineboxio
![]()
Lessons learned building a smoking detector for video with machine learning was originally published in Towards Data Science on Medium, where people are continuing the conversation by highlighting and responding to this story.